
Avoiding Overload with Regions
Tutorial Contents
-
Prerequisites
-
Before You Start
-
About Image Overlays
-
Find the bounding box in an image overlay example:
-
Adjust the image overlay:
-
Revert to the original image overlay:
-
About Regions
-
Latitude, Longitude, and Altitude Box
-
Level of Detail
-
Why 3D boxes?
-
Comparing
<GroundOverlay>and<Region> -
Create a Region By Modifying a GroundOverlay
-
Adjust the Screen Overlay
-
Specify your level of detail
-
Copy the image overlay to a text editor
-
Edit the
<GroundOverlay>tag -
Add your new region to the Brooklyn Hospitals folder
-
Test out your new region-enabled KML
-
What else can regions do?
-
FAQs
-
Download this sample KMZ file for some examples relating to these questions.
-
Power tools for regions
-
Creating Super-Overlays
-
Adding Regions to Placemarks:
-
Discussion and Feedback
-
What's Next
Prerequisites
In April 2017, Google Earth on Web was released, which puts Earth on the browser. However, for this tutorial, you will need Earth for Desktop installed on your computer. Download the latest version here.
KML Regions can greatly improve the user experience. This feature allows you to limit the visibility of densely positioned placemarks to low altitudes, split high-resolution images and load them in increasing levels of detail using Super Overlays, and dynamically load new KML files based on the viewer's location. Here are some examples of datasets that use regions:
 NASA Blue Marble Next Generation
Rumsey Historical Maps, available in the Gallery in Google Earth Pro's Layers panel.
Since there is no user interface for creating regions in Google Earth, this tutorial explains how to create a region by modifying another KML feature with a similar structure - the GroundOverlay.
Before You Start
In order to complete this tutorial you should:
- Have a general familiarity with KML, specifically the structure of a GroundOverlay. If you don't, please familiarize yourself with the official KML Documentation, the Google Earth User Guide and the KML Samples.
- Read through the Regions section of the KML Tutorial.
- Explore some of the sample KMLs above that make use of regions to understand how they can be useful in real-world applications.
- Feel comfortable making small edits to KML using a text editor, like Notepad++ (Windows), TextEdit or BBEdit (OS X), or jEdit for all platforms (recommended).
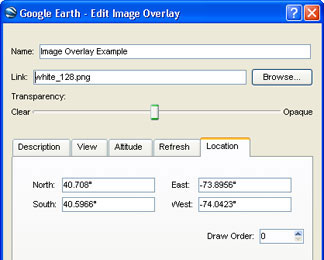
About Image Overlays
If you've ever seen an image overlay in Google Earth, you might have noticed that they are usually rectangular. You set the size and position of an image overlay by specifying the north, south, east, and west edges of the image.
Note: Image overlays in Google Earth are created in KML using the <GroundOverlay> tag. This tutorial uses both terms interchangeably.
Find the bounding box in an image overlay example:
Click to download the image overlay example above.
Double-click the downloaded file to open it in Google Earth Pro.
Right-click on the Image Overlay under the Image Overlay Example document in the Places panel, and select Properties from the context menu.
Select the Location tab.
This tab shows the north, south, east, and west edges of the image overlay.
Adjust the image overlay:
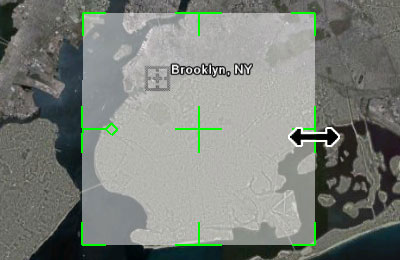
Move the Edit Image Overlay window aside, so you can see the image overlay on the map.
Adjust the size and shape of the image overlay by clicking and dragging the green sides and corners (“handles”). (Move the cursor slowly over the green handles until it changes to a double-sided arrow. Then you can click and drag the handles.)
Move the image overlay by clicking and dragging on the cross in the center of the overlay. (Move the cursor slowly over the green cross in the center until it changes to a pointing finger. Then you can move the image overlay.)
Revert to the original image overlay:
- If you have not yet clicked OK in the Edit Image Overlay window after making changes, click Cancel to restore the original.
- If you have already clicked OK after making changes, right-click on Image Overlay in the Places panel, and select Revert from the context menu to restore the original.
About Regions
Regions control the visibility of placemarks and other KML features by defining two parameters:
- Latitude, longitude, and altitude
- Level of detail
Latitude, Longitude, and Altitude Box
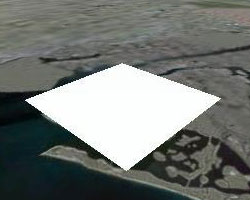
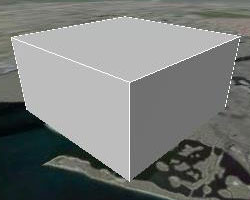
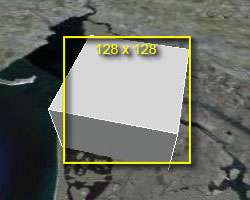
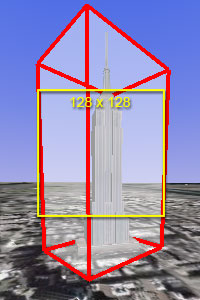
Regions define either a flat rectangle (2-dimensional area) or a 3D box (3-dimensional volume) on the map. Because regions are invisible, look at the the rectangular KML polygon (below left) and extruded polygon/3D box (below right) to visualize a region. Both have the same north, south, east and west boundaries, but the “Region” box (right) also has an altitude value specified, which gives the region height.
Level of Detail
Regions also specify how big their rectangle or box must look on your screen before it is considered active or inactive. This measurement is the square root of the area the region consumes on your screen, measured in pixels.
For example, if you specify that the flat region (below left) has a minLodPixels of 128, it must appear to be at least 128 x 128 pixels in size in Google Earth before it is active. Notice that the 3D box (below right) also appears to be approximately 128 x 128 pixels in Google Earth, which means it would also be active.

Why 3D boxes?
Why should you use regions that are not flat? Because 3D boxes are useful when applying regions to 3-dimensional Sketchup models. Regions are used to turn features on or off depending on how close you are to them.
With a 3D model like the Empire State Building (shown below), if the camera is tilted close to the horizon (that is, tilted upward), you can be very close to a model with a flat region (left) without it being large enough on the screen to activate. By making the region a 3D box that surrounds the 3D model, you can look at the model from the side, and still activate the region at a reasonable distance (right). Learn more about creating 3D regions using the <minAltitude> and <maxAltitude> tags by reading the Regions section of the KML Tutorial.

Comparing <GroundOverlay> and <Region>
The KML for a <GroundOverlay> and <Region> is very similar. They both use a bounding box to define the north, south, east, and west edges. Take a side-by-side look at the way that a simple GroundOverlay (left) and a Region (right) are represented in KML:
| GroundOverlay | Region |
|---|---|
<GroundOverlay> |
<Region> |
<name>Example Ground Overlay</name> |
<Lod> |
<Icon> |
<minLodPixels>128</minLodPixels> |
<href>white_square.png</href> |
</Lod> |
</Icon> |
|
<LatLonBox> |
<LatLonAltBox> |
<north>45</north> |
<north>45</north> |
<south>0</south> |
<south>0</south> |
<east>90/east> |
<east>90</east> |
<west>0</west> |
<west>0</west> |
</LatLonBox> |
</LatLonAltBox> |
</GroundOverlay> |
</Region> |
In a ground overlay, the bounding box is called a <LatLonBox>. In a region it is called <LatLonAltBox>. By optionally adding <minAltitude> and <maxAltitude> tags to a Region's LatLonAltBox (not included above), you will create a 3D region for use with 3D Sketchup models.
Create a Region By Modifying a GroundOverlay
Now that you have seen the similarity between regions and ground overlays, you can learn how to use one to create the other. Download the Image Overlay Example KMZ file, if you haven't done so already, and then download the following Brooklyn Hospitals and Screen Overlay Size Guide KMZ files:
Screen Overlay Size Guide (turned off by default)
Load all of these files in Google Earth. Once the Brooklyn Hospitals file loads, zoom away from New York City to see how all the icons and labels overlap each other and are not easily visible from higher altitudes. You can improve the experience by using a region to control when these placemarks are visible.
Adjust the Screen Overlay
The overlay is a little over-sized and off-center for our hospitals. So the first step is to fine tune the image overlay's placement and size.
Double-click Image Overlay in the Image Overlay Example document to zoom back in.
If you would like some guidance in sizing and moving your image overlay, you can use the Bounding Box Guides placemark underneath the Image Overlay— turn it on by clicking the box next to its name in the Places Panel . Four yellow arrows will appear which indicate the suggested north, south, east and west edges for your image overlay.
Right-click Image Overlay in the Places panel, and select Properties from the context menu.
Hold down the Shift key, and click and drag the corners of the image overlay to make it a little smaller.
Note: Holding down Shift key maintains the image's aspect ratio and keeps the overlay square. Your regions don't have to be square, but in this tutorial the image overlay is square.
Click and drag the cross in the center of the image overlay to a position where all of the hospital icons are covered by the overlay.
Resize the overlay again, if necessary.
When you finish adjusting the image overlay, click OK in the Edit Image Overlay dialog.
If you used the Bounding Box Guides placemarks, check the box next to its name in the Places panel to turn them off.

Specify your level of detail
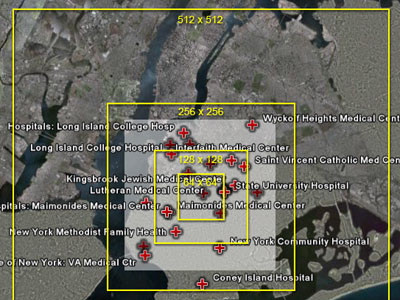
Check the box next to Region Size Guide in the Places panel to turn it on.
Yellow boxes of different sizes appear on the screen. This is a screen overlay that acts as a guide no matter where you move on the Earth.
Press R to ensure that your view is facing north and that you are looking straight down onto the Earth (no tilt).
Increase or decrease the size of the image overlay to match one of the yellow boxes.
This guide helps you determine which level of detail is best for your placemarks. Keep in mind that the Region Size Guide is an approximation; although the box sizes are labeled, the calculation of a region's on-screen size is complex and depends on many variables, including the curvature of the Earth and camera tilt. When selecting a size, remember that the region will appear at approximately this distance from the Earth.
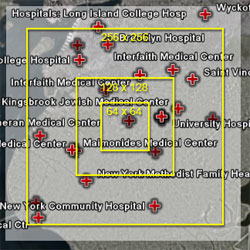
Zoom out until the image overlay is about the same size as the 256 x 256 yellow box.
If you specify a minimum level of detail for these placemarks at 256 pixels, they will be invisible until the size of the region, which we'll create from your adjusted image overlay, is at least this size on your screen.
Copy the image overlay to a text editor
Edit the <GroundOverlay> tag
Delete everything except the
<LatLonBox>and</LatLonBox>tag pair and its contents.<LatLonAltBox> <north>40.708019</north> <south>40.596643</south> <east>-73.895570</east> <west>-74.042349</west> </LatLonAltBox>Change
<LatLonBox>and</LatLonBox>to<LatLonAltBox>and</LatLonAltBox>If you want to make a 3D region, refer to the Altitude section in the KML 2.1 Tutorial page for the additional tags you must add (
<min/maxAltitude>and<altitudeMode>).Specify 256 as the minimum LOD size by adding the
<Lod>and<minLodPixels>tags as follows after the</LatLonAltBox>tag.<Lod> <minLodPixels>256</minLodPixels> </Lod>Add the opening and closing
<Region>and</Region>tag pair above and below the KML code you have so far.When you are done, it should look something like this:
<Region>
  <LatLonAltBox>
    <north>40.708019</north>
    <south>40.596643</south>
    <east>-73.895570</east>
    <west>-74.042349</west>
  </LatLonAltBox>
  <Lod>
    <minLodPixels>256</minLodPixels>
  </Lod>
</Region>
Save the file to your desktop as
region.kml.
Add your new region to the Brooklyn Hospitals folder
In Google Earth, right-click Brooklyn Hospitals in the Places panel, and select Copy from the context menu.
Open a new blank document in your text editor, and paste the KML code for the Brooklyn Hospitals folder into it.
Save the file to your desktop as
hospitals_region.kml, but don't close it.Open the
region.kmlfile, and select and copy all of the KML for your region.Go back to the
hospitals_region.kml, put the cursor at the top of the file, and then search for the opening<Folder>tag.<Folder> <name>Brooklyn Hospitals</name> PASTE REGION HERE ... other KML tags <Placemark>Paste the region you just copied on the line after the
</name>tag. The beginning of the<Folder>area of thehospitals_region.kmlfile should now look something like this:<Folder> <name>Brooklyn Hospitals</name> <Region> <LatLonAltBox> <north>40.708019</north> <south>40.596643</south> <east>-73.895570</east> <west>-74.042349</west> </LatLonAltBox> <Lod> <minLodPixels>256</minLodPixels> </Lod> </Region> ... other kml tags <Placemark>Save the
hospitals_region.kmlfile.
Test out your new region-enabled KML
In Google Earth, delete the original Brooklyn Hospitals folder, and then open the new
hospitals_region.kmlfile you created.Zoom in and out from the Brooklyn area.
When the image overlay gets smaller than the 256 x 256 yellow square, all of the Brooklyn Hospital placemarks should disappear.
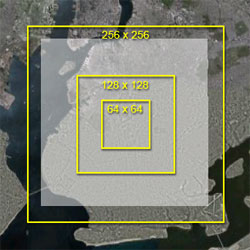
Left: Region is inactive. The area on screen is less than the 256-pixel minimum LOD size.
Right: Region is active. The area on screen is more than the 256-pixels minimum LOD size.
If the placemarks don't disappear as you zoom away, try loading this ready-to-go region-enabled hospitals KML
. You can compare this file to the one you created to see where you went wrong.
What else can regions do?
Regions work on more than just folders. You can add them to any feature in Google Earth, such as: 3D models, placemarks, image overlays, polygons, and paths. Simply paste a region inside the feature's KML tag. Remember that a region specified inside a feature (like placemarks, models, and so on) overrides a region placed inside its parent folder. So you can specify a single region for many less important placemarks in a folder but still have a single important placemark visible at further distances.
FAQs
Q: When should I use regions?
Regions have lots of uses, many of which are beyond the scope of this tutorial. A short list includes:
- When you have lots of placemarks that are dense and clutter the screen
- If you want to show image overlays in increasing levels of detail as you zoom in without taxing the user's computer (See “Super Overlays” below.)
- To show a hierarchy of features, such as KML country borders that fade away as state borders fade in
- 3D models are often taxing on your computer, even when they are too far away to see them. Use a region with your models to make them disappear when the user is far away.
- Make screen overlays appear when users are close to features that need explanation or a legend
Q: What are good values for min/maxLodPixels pixels?
A value of 128 pixels is ideal due to the way Google Earth handles the zooming of image tiles and other features, but 128 isn't always practical depending on your needs. Values that work best for
minLodPixelsare powers of two: 64, 128, 256, 512, 1024, 2048, etc. (2^6 = 64, 2^7 = 128), but other numbers will also work: e.g., 100, 500, 1000.
Q: Can I make a feature disappear as I get closer to it?
Yes. Instead of using
<minLodPixels>in your Region, use<maxLodPixels>. Then, when the screen area of the region reaches the specified pixel value, that feature or folder disappears. This method is handy for features like low-resolution maps or historic satellite images that you want to appear on the Earth from far away but disappear when you get close to the ground, where it would obscure the high-resolution satellite imagery.
Q: What happens if I specify both a <minLodPixels> and <maxLodPixels>?
When you specify both a minimum and maximum LOD value for your region, the feature appears when the size is at the
<minLodPixels>and disappears when it reaches the<maxLodPixels>. Just make sure that the maximum value is always larger than the minimum.This method is useful when you want to have multiple levels of detail in your KML. For example, at high altitude, you could represent a 3D Sketchup model of a pyramid with just a simple placemark. As you get closer, you could switch to a simple outline of the pyramid using a flat polygon. At close range, you could show the actual 3D model. In this case, you would use three regions with the same
<LatLonAltBox>and different but overlapping<Lod>settings:
- Single placemark, visible from outer space to mid-range:
<maxLodPixels>256</maxLodPixels>- Polygon outline of pyramid, visible from mid-range to short range:
<minLodPixels>256</minLodPixels>and<maxLodPixels>1024</maxLodPixels>- 3D model of pyramid: visible short range to really close:
<minLodPixels>1024</minLodPixels>
Q: How do I make my features visible no matter how far in or out I zoom?
If you don't specify a maximum LOD value, the default is set to -1. This means that the feature will be visible no matter how far in you zoom. If you want to explicitly specify it, use
<maxLodPixels>-1</maxLodPixels>.If you don't specify a minimum LOD value, the default is 0. This means that the feature is visible no matter how far away you zoom from it. If you want to explicitly specify it, use
<minLodPixels>0</minLodPixels>.
Q: What is <min/maxFadeExtent>?
As explained in the KML 2.1 Tutorial, you can specify a fade extent for your region. This means that instead of instantly appearing or disappearing, some features slowing fade in or out. However, only image overlays, screen overlays, polygons, and paths fade in and out. 3D models and regular placemarks appear and disappear instantly.
Q: Why does my region appear at low altitudes when I am using a smaller monitor?
The area of a region on a screen depends on the size of Google Earth's 3D viewport. Therefore regions will activate and deactivate at different altitudes depending on screen size. You can experiment with this by minimizing your Google Earth window and dragging the lower-right corner to resize it. Because the camera's altitude doesn't change when you resize Google Earth, everything has to shrink to keep the same distance from the Earth. Because of this differing behavior, be sure to check your regions at average monitor sizes; most Google Earth users have a monitor display of 1024x768. To get an idea of how things will work on their screens, resize Google Earth's viewport to 640x480 or 800x600. You can change the viewport size by selecting View > View Size > Computer Playback in Google Earth and then selecting a display size.
Power tools for regions
Regions are capable of much more than simply turning off individual features at a specific zoom level. By using network links and regions together, you can create a nested system of KMLs that can load placemarks or image overlays (called Super Overlays) in increasing levels of detail as you zoom in.
Super Overlays are too complex to create by hand in KML. A few tools are available to make Super Overlays automatically. They chop up high-resolution imagery tiles and generate KML with Regions to activate the these tiles in increasing levels of detail as you zoom in. Please note that the three Windows-based products are not officially endorsed by Google.
Creating Super-Overlays
- Google Earth Pro: Importing a large georeferenced image will bring up a dialog with the option to generate a SuperOverlay.
- Windows application: Valery Hronusov's SuperOverlay ($20/$35/$90)
- Windows application: Tiles2KML ($40/$90)
- Windows command-line tool: Paolo Mistrangelo's Super Overlay Tiler
- Python programming library: Regionator at developers.google.com (provides more useful KML tools)
Adding Regions to Placemarks:
The Regionator Python library also has the ability to divide thousands of placemarks, polygons and paths into separate regions for better viewing. For example, if you wanted to create a KML layer that had all the hospitals in the United States—perhaps tens or hundreds of thousands of points—without a completely overwhelming experience at high altitude, Regionator would be a great tool to use.
Regionator also offers many other KML tools, such as a link checker which will search your KML for hyperlinks, images and link to other KMLs and report missing files or bad URLs. Keep in mind that this is a programming library in the Python language, which means you need some experience with programming and using the command prompt in order to use it.
Discussion and Feedback
Have questions about this tutorial? Want to give us some feedback? Visit the Google Earth Help Community to discuss it with others.